


nVidia DDS Photoshop Plug-in (Click here to download).
Creating a skin
Important steps when painting your own skin:
- The template size may differ from the size required. It is recommended that you paint the skin with the template at this size. However, when uploading skins for use in the UKDirt rFactor leagues, you should resize your skin to 1024 x 512 before converting it to a DDS file.
-It can be useful to use layers, some templates have ready labelled layers in them.
NOTE: You'll notice that on some of of the templates, the shading and polygon edges on the body/wing panels have been left on the template (so you can see the contours of the car so you can paint certain parts without having to keep looking in game to check you have things where you want them in relation to the shape of the panels etc). To colour these you just need to draw a rough selection around them on the correct layer and then select them, then flood fill them a solid colour. You don't need to leave the details/shading underneath. It really is that simple.
Always keep the PSD files of the cars that you upload for inclusion into the league.
Converting a skin
To get the skin into game you need to save the finished product as a DDS. To save as this file format, you will need to:
- Download the nVidia DDS Photoshop Plug-in (this build v6.74 - newer versions can cause problems in rFactor).
- Unzip the plug-in using WinZIP/WinRAR and drop the resulting file in your C:\Program Files\Adobe\Adobe Photoshop CS2\Plug-Ins\File Formats folder. (NOTE: this directory may be different for other version of Photoshop - I am using Photoshop CS2)
- Open your skin in photoshop, and go to File and then Save As. You should now be able to save as a DDS file.
- Be sure to name your file correctly as renaming outside of Photoshop can cause problems !!!
- The saved file should be like this XXXYYY.DDS (XXX is you race number, and YYY is the model name of the chassis).
- See below for chassis model names, check the screenshot-section if you want to see the chassis.
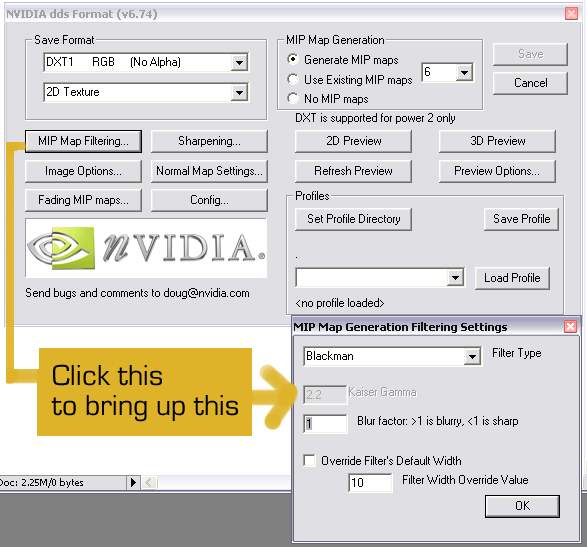
- When you click save, the plug-in dialog will come up - make sure the settings are exactly as in the picture below.
Using a skin
You should now have a skin, whether you painted it yourself, or had someone do it for you. To use it in game you will need to make a VEH file that corresponds with the DDS file that you have made.
The structure of the file system within rFactor is reasonably simple, but it's important to understand it before you start trying to put your skin into game. Here's a few simple steps to help you understand.
- Go to C:\Program Files\rFactor\GameData\Vehicles\XXXXXX (pick the league of your choose).
Here you will see a selection of folders and files.
Pick the folder of your choose that corresponds with the league that you painted your car for.
- RFactor F1
-- C:\Program Files\rFactor\GameData\Vehicles\F1Stockcar\TarmacOL\
-- C:\Program Files\rFactor\GameData\Vehicles\F1Stockcar\ShaleOL\
- RFactor Hotrod:
The following is based on RFactor F1, but the method is the same for all leagues.
In each one you will find a 'Novice' folder. This is where the green novice cars are held. Open one of these folders.
For each of the different chassis, you will notice that there is one DDS file and one corresponding VEH file with exactly the same name. The DDS is the skin itself, and the VEH file is what rFactor uses to load the right skin, among other things.Depending on what kind of chassis your gonna use open ShaleOL or TarmacOL.
Always use these VEH Files as starters when adding a new skin into game, making sure you pick the right VEH file for the right chassis - be very careful about this as it is very important.
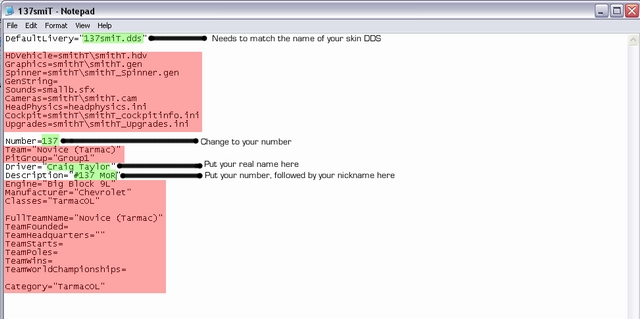
For example, lets imagine you have just painted a smiT car:
- Go to C:\Program Files\rFactor\GameData\Vehicles\F1Stockcar\TarmacOL\Novice (Tarmac) and MAKE A COPY (copy and paste it, don't 'save as' as it wont save as a .veh!!!) of the VEH file called EX_smiT.
- Rename it to 137smiT (137 being my number, obviously, use your own).
- Open the VEH in notepad. Please refer to the picture below; adjust all of bits ive highlighted in green, but DO NOT adjust the bits highlighted in red!
Make sure your DDS is named EXACTLY the same as the VEH file (for mine it would be 137smiT) and then put it in this folder.
You do not need to add any more entries for other players. People will be able to see everyone elses cars by installing the skin packs.
